
Want to give your visitors a new experience to search custom real-time weather updates for any location—directly from your WordPress site? Yes, you can do it from now on!
With the new Custom Weather Search feature in the Location Weather plugin by ShapedPlugin, you can allow users to instantly view live forecasts by entering a City Name, City ID, ZIP Code, or Coordinates—all within your existing widget layout. Learn more about how a weather forecast helps your business.
If you run a travel agency, logistics business, event service, farm, or retail store, offering precise, real-time weather data helps customers make informed decisions, builds trust, and boosts engagement. Once enabled, this Custom Weather Searching Tool goes beyond fixed displays, delivering location-specific forecasts on demand.
In this blog, I’ll show you exactly how to set it up; no coding is required.
Let’s get started!
What Is the Custom Weather Search in WordPress?
Custom Location Weather Forecast Search is not just a search box — in fact, it turns your site into a live forecasting hub, putting users in control of the weather they care about.
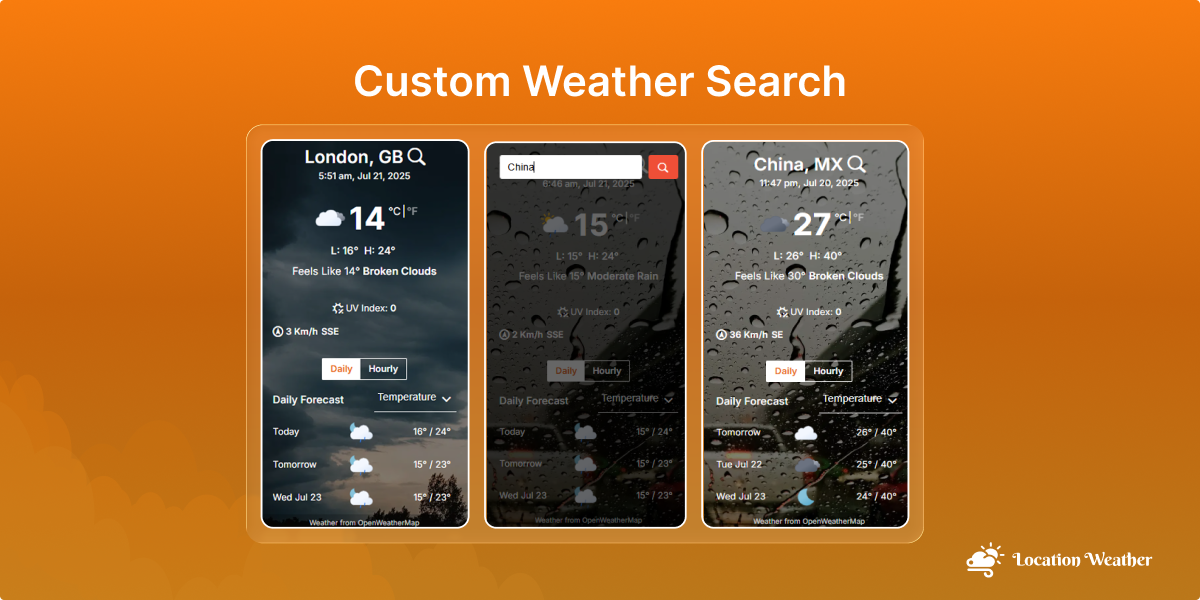
Instead of displaying a fixed weather forecast for just one city, the newly added Custom Weather Search is an interactive feature that enables users to search and view real-time weather updates for any location — directly from your existing widget, with live results.
Why is the Custom Weather Search Essential?
When your customers are planning for a family trip, a delivery route, or an outdoor event, the weather is a key consideration. And not just any weather. They want forecasts that are relevant, real-time, and personalized to their specific location.
This is why the Custom Weather Search is valuable. It allows users to search for live, location-specific weather updates — by City Name, City ID, ZIP Code, or Coordinates for any location — all with a simple, interactive weather widget on your WordPress site.
For example, if you’re running a travel agency, logistics platform, or a retail business that depends on local weather, this custom weather search can be a game-changer.
✅ Key Benefits of Using Custom Weather Search:
The Custom Weather Search is the best feature for your WordPress site, because:
- 🎯 Personalized Experience – Allows users to view forecasts for their desired and custom location.
- 🌎 Serve a Global Audience – Supports over 200,000 WordPress cities worldwide.
- 🚀 Boost Engagement – Interactive & custom searching facility keeps users active on your site.
- 💼 Supports Decision-Making – Perfect for weather-dependent services like travel, delivery, and events.
- 🔧 Easy Integration – no coding required, easy to integrate using the Location Weather plugin.
How Custom Weather Search Works?
Above all! The Custom Weather Forecast Updates feature works by integrating a smart, lightweight search box into your website using the Location Weather plugin. When a visitor enters a City Name, City ID, ZIP Code, or Geographic Coordinates, the plugin sends the query to OpenWeatherMap’s API, instantly fetching and displaying live weather data for the specific location they’re searching for.
Moreover! There’s no page reload or external redirection. As a result, the forecast appears dynamically on your WordPress site, creating a seamless, visual, and user-friendly widget.
Supported Location Input Methods
To ensure maximum flexibility and precision, the Custom Weather Search supports multiple input types. This allows users to search and view the latest weather updates based on:
- 🏙️ City Name (e.g., “Paris” or “New York”)
- 🧾 City ID (specific to OpenWeatherMap database), Get city ID
- 📮 ZIP or Postal Code (e.g., “90210”), instructions
- 🧭 Geographic Coordinates (Latitude & Longitude) (e.g., “40.7128, -74.0060”), Get coordinates

Note: These input options ensure your visitors can always find the location they care about — whether it’s a major city or a remote area.
How to Enable Custom Weather Search in Location Weather Plugin?
If you have already installed the Location Weather Plugin. Just follow the steps below to get started. If you’re a newcomer ( future master), check the ‘How to Install‘ section. Great!
Now, let’s follow the steps below to get started:
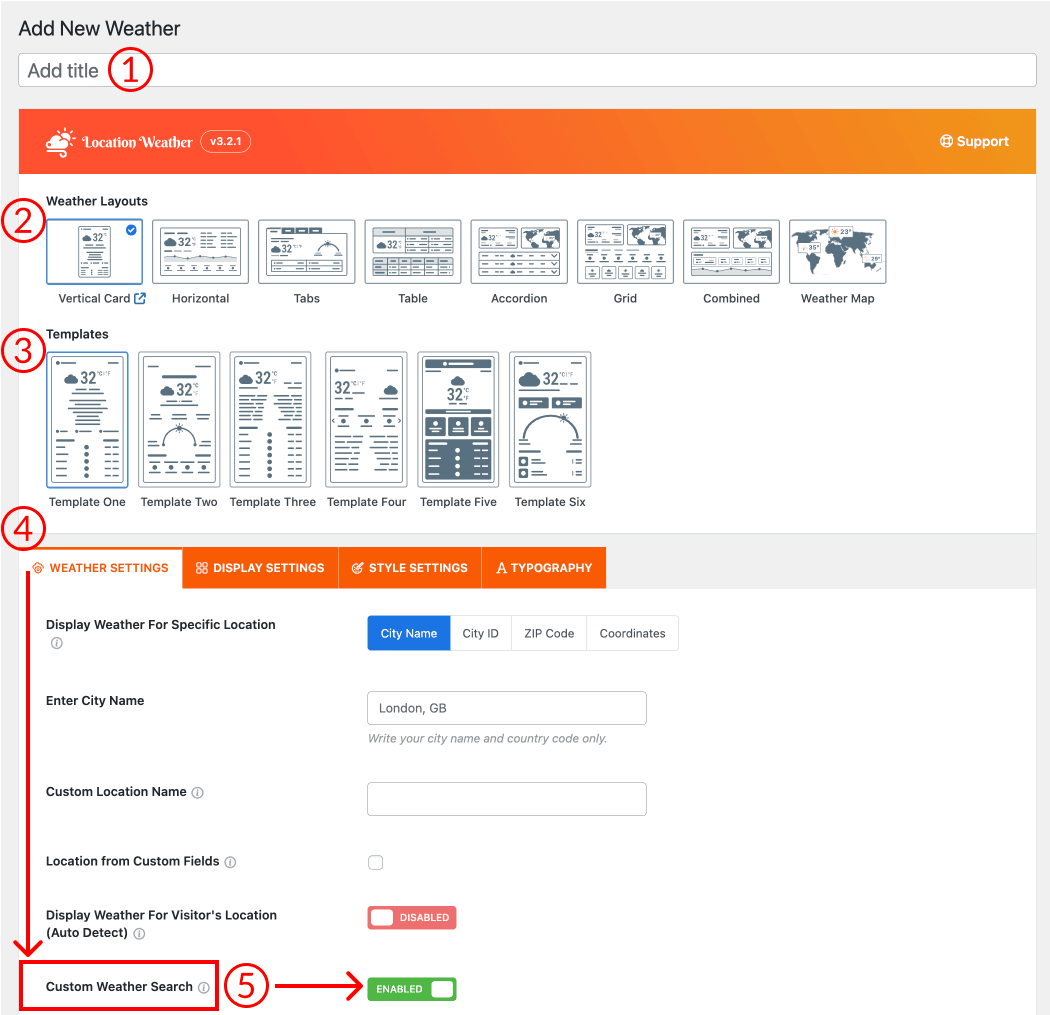
Add New Weather Table:
- Go to WordPress Dashboard → Location Weather → Add New, and give it a title.
- Choose Layout & Template: Choose your preferred Weather Layout and a matching Template.
- Configure Location Settings: In the Weather Settings tab:
- Enter your Location Name— by City Name, City ID, ZIP Code, or Coordinates.
- Enter the location and, optionally, assign a custom name to display.
- To activate it, find the Custom Weather Search toggle and turn it on.
- Lastly:
- Enable Visitor Location if needed.
- Select preferred temperature units (°C/°F), then publish your weather table.
How to Check the Custom Weather Updates Tab on Your Site?
- Click “Publish” or “Update” to save your desired weather table.
- Copy the generated shortcode.
- Go to any page or post in the WordPress editor.
- Paste the shortcode into a Shortcode block or directly into the content area.
- Publish or update the page — your weather forecast is now live!
How Exactly Does the Custom Weather Forecast Work?
Once you publish your weather widget with the shortcode:
- A search icon appears next to the displayed location.
- Clicking the icon opens a Search field.
- Users can enter a City Name, City ID, ZIP Code, or Coordinates and press Enter.
- The widget instantly updates to show weather data for the entered location, keeping your chosen layout and style.
No more hassle! In just seconds, your visitors can enjoy a smooth, interactive way to access weather updates for any location they choose.

Final Thoughts:
Why wait? Download Location Weather today, enable the Custom Weather Search feature, and let your users enjoy instant, real-time weather updates for any location. Consequently, you can enhance user satisfaction, foster trust, and encourage repeat business while increasing your conversion rates.


Leave a Reply