Do you want to create a beautiful and accurate weather widget for WordPress website and steal the thunder of your top competitors?
The customers of your weather-impacted businesses want to see the weather before they book and buy. So, adding weather widgets for your weather-impacted business websites is a great way to help your customers make timely plans and grow sales.
Apart from that, many government and non-government organizations concerned about weather, safety, agriculture, environment, climate change, etc, use weather widgets on their websites to provide people with real-time weather conditions.
In this blog, I’ll show you how to add a weather widget to your WordPress website in minutes without coding.
So, let’s get in.
4 simple steps to create a weather widget for WordPress website
Step 1: Install and activate Location Weather
Location Weather is the #1 weather widget plugin for WordPress. It powered up 12,000+ business and organization websites with beautiful and accurate weather widgets for any location worldwide. This most popular weather widget forecast plugin has been developed by prominent WordPress plugin company ShapedPlugin, which powered up about 300,000 websites and accelerated their business growth.
The robust features, thoughtful design, intuitive interfaces, ease of use, regular updates, versed and fast dedicated support team, and users’ love for the plugin made it the #1 WordPress weather widget plugin.
So, let’s install Location Weather. It’s simple.
However, if you are a new (future Leo), please see the documentation or watch the following tutorial to install and activate the plugin.
You can say hi to the Location Weather support team for further help.
Step 2: Get a free weather API for your WordPress website
After you install and activate Location Weather, it must be on your WordPress dashboard admin sidebar, as seen in the following image. Now, follow the next steps to get a free weather API key from OpenWeather and set it in Location Weather.
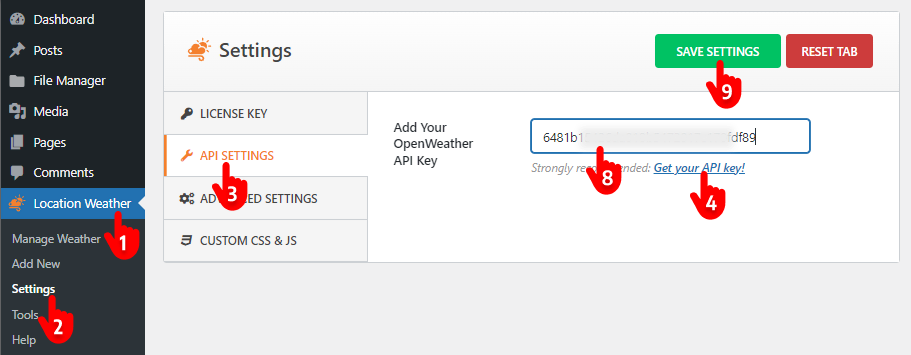
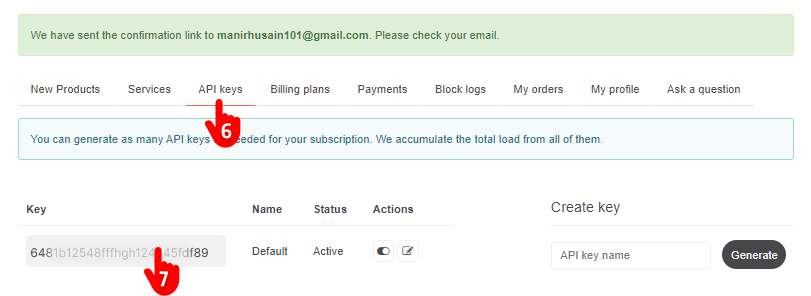
1. First, click Location Weather. → 2. Settings. → 3. API SETTINGS → 4. Get your API key. It will take you to the Sign Up page on openweathermap.org. → 5. Put your name and email and sign up. → 6. Click the tab API keys. → 7. Copy the API key and return to Location Weather on your WordPress dashboard. → 8. Paste your API key in the field. → 9. Hit the SAVE SETTINGS button.
Note: This new free API key allows you to show current weather and 3-hourly weather forecast widgets for up to 120 hours (5 days). To show 1-hourly forecast for 48 hours and daily forecast data for 8 days for free, subscribe to OpenWeather’s One Call API 3.0 plan with your valid credit card information. It is free for up to 1000 calls per day. However, when it exceeds 1000 calls per day, it will cost. Also, you can set the call limit to 1000 per day to avoid any cost if you don’t need more than 1000 calls a day.
Step 3: Create a weather widget for your WordPress website
After setting the OpenWeather API key, it’s time to dive into the main course: designing a beautiful weather widget for your website.
Select the best weather widget template for your website
Location Weather offers you 17+ beautiful and responsive weather templates. Select the template you like most for your weather widget.
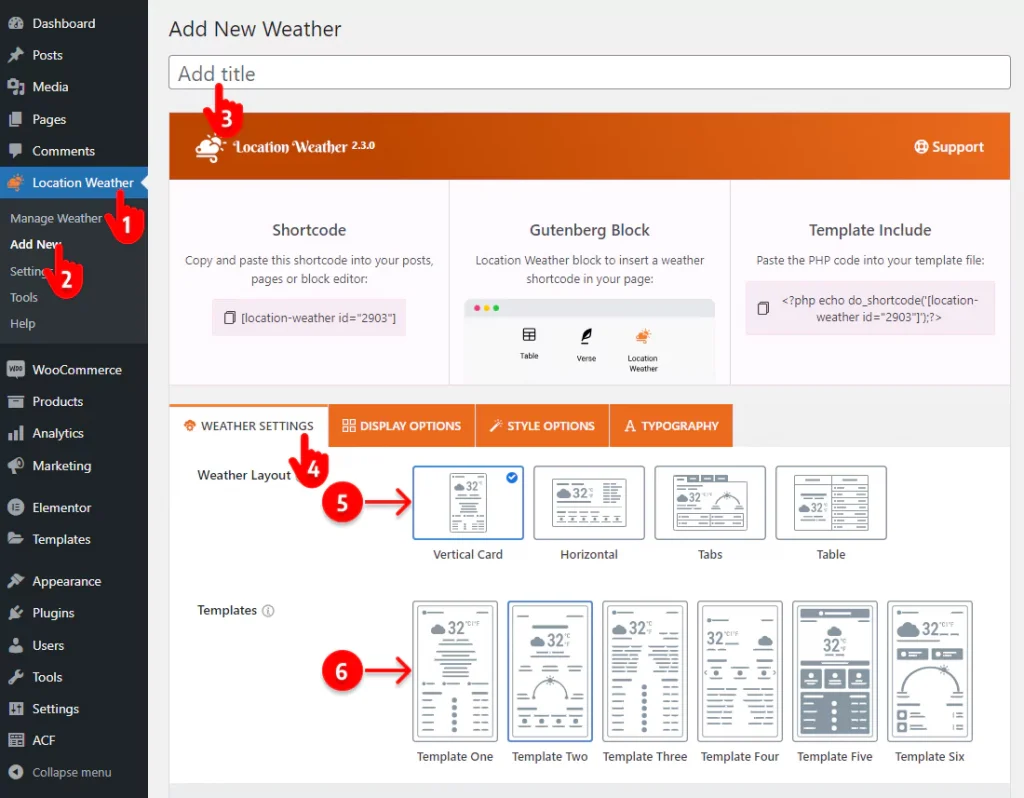
- First, click Location Weather on your WordPress admin sidebar.
- Next, click Add New of Location Weather.
- Name your weather widget.
- Select the WEATHER SETTINGS tab.
- Select the layout that meets your requirements and fits your site style best.
- Choose the template you like most.
- Use the PREVIEW button at the bottom right to preview the appearance of the templates and choose the best one for your website.
Set the location
After choosing a template, set the location for which you want to show the weather widget. Here, you get two options:
- Showing weather for your business location.
- Showing weather for your visitors’ respective locations.
For example, a booking website needs to show the weather forecasts for its service locations, while a news website needs to show weather widgets for its visitors’ respective locations.
Furthermore, you can automate showing weather for visitors’ locations by enabling auto location detection with a single click in Location Weather.
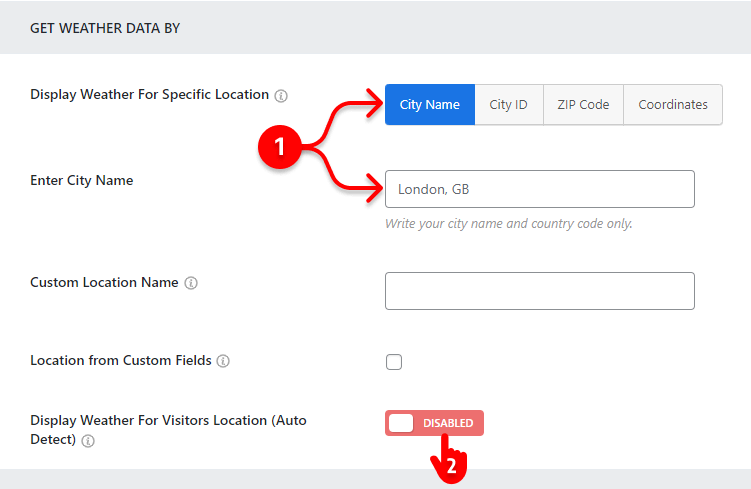
1. Put the city name/city ID/zip code/or coordinates (highly recommended if you want to show forecasts with a free OpenWeather API key) of your business location to set a weather forecast widget for its location.
This option is for booking platforms, hotels and resorts, real estate companies, sports & event organizers, transport & tourism, amusement complexes & theme parks, educational institutes, local organizations, etc.
Besides that, Location Weather allows you to set locations from custom fields.
Moreover, you can change the location name with your business name or whatever you like.
2. Turn on auto-detection of visitors’ locations.
This option is for News and media, agriculture, public safety and environment organizations, Weather-relevant services and products, and any website to help visitors with daily weather information.
By the way, a basic weather widget for WordPress website is ready now. Click the PREVIEW button at the bottom right to see how it looks.
Now, you can dive into more settings and customizations to make your weather widget more user-friendly and consistent with your website design style.
Use your visitors’ preferred weather data units
Celsius is the most used temperature unit in the world, but Fahrenheit is still used in some countries and territories. So, use the most common weather data units for your visitors.
Location Weather offers many weather data unit options so that you can seamlessly choose the locally preferred weather data measurement units. They include:
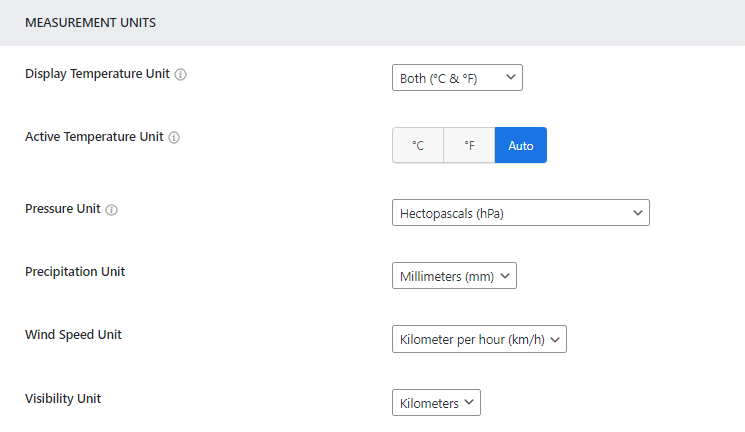
- Celsius (°C)
- Fahrenheit (°F)
- Both Celsius & Fahrenheit (Auto)
- Precipitation in mm/inch
- 7 Air pressure units
- 4 Wind speed units
- 9+ Date and time formats
- Visibility in kilos/miles
Add weather forecast data
Set weather forecast data to your weather widget for WordPress website.
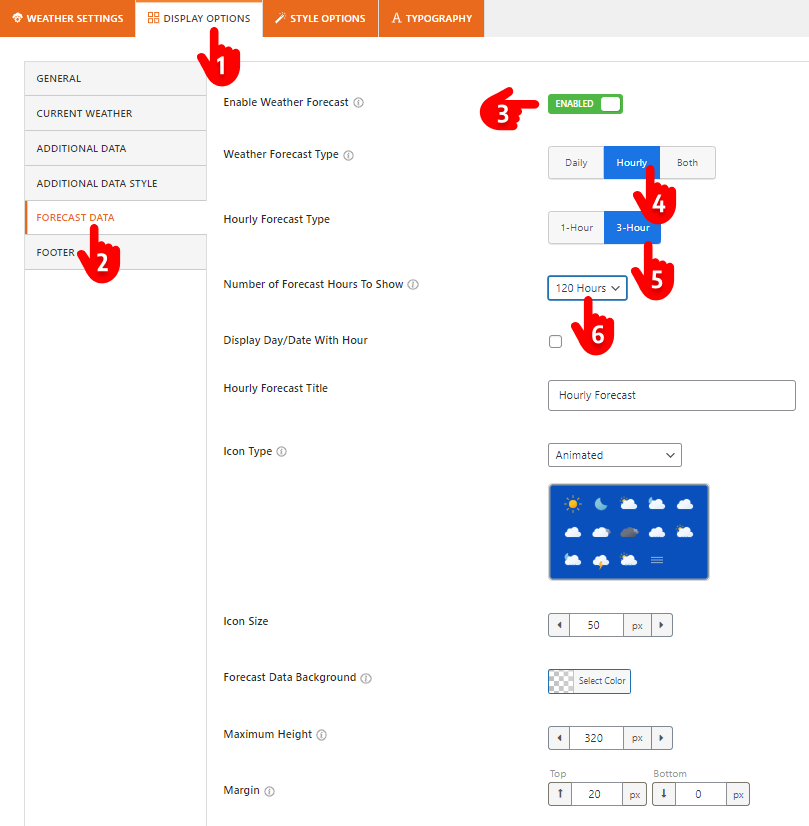
- Click the DISPLAY OPTIONS tab on the top.
- Click the FORECAST DATA tab on the left tab bar.
- Enable Weather Forecast.
- Select daily (required paid API), hourly, or both (required paid API) forecast options.
- Select hourly (required paid API) or three hourly (free API) forecast options.
- You can show three hourly weather forecast widgets for up to 120 hours with a free OpenWeahter API.
In addition, you can use animated, static, fill, line, and glass morphism icons with custom sizes, custom background colors, and custom margins for the weather forecast widget.
Turn on/off additional weather data toggles
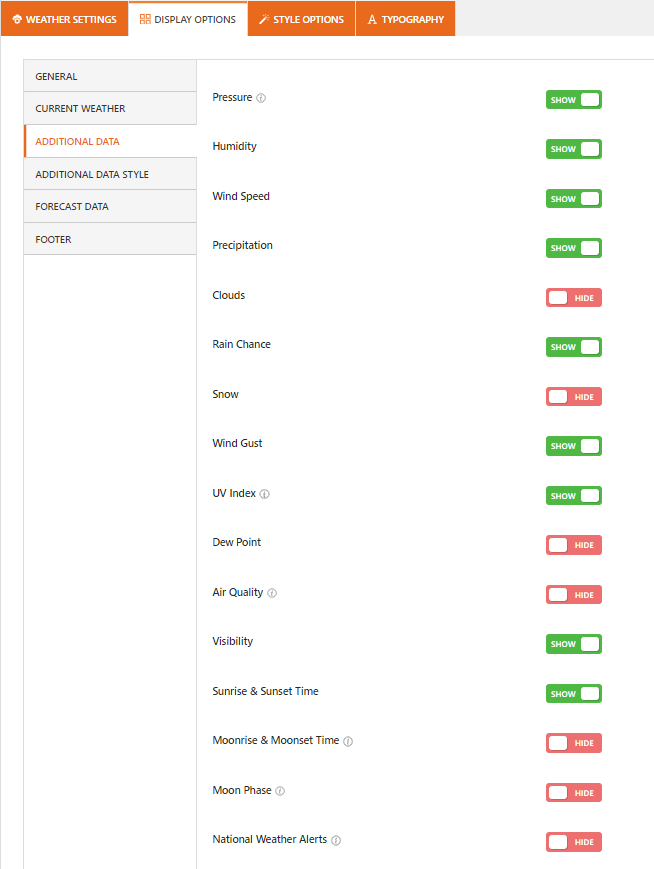
Location Weather offers 20+ weather data toggles, as seen in the image below. You can turn these toggles on and off to show and hide additional weather data according to your requirements and preferences.
Customize your weather widget
Location Weather is the highest-rated weather widget plugin for WordPress. It offers you a wide range of powerful and user-friendly customization features. So, you can design your WordPress weather forecast exactly how you want. Some of the robust features are:
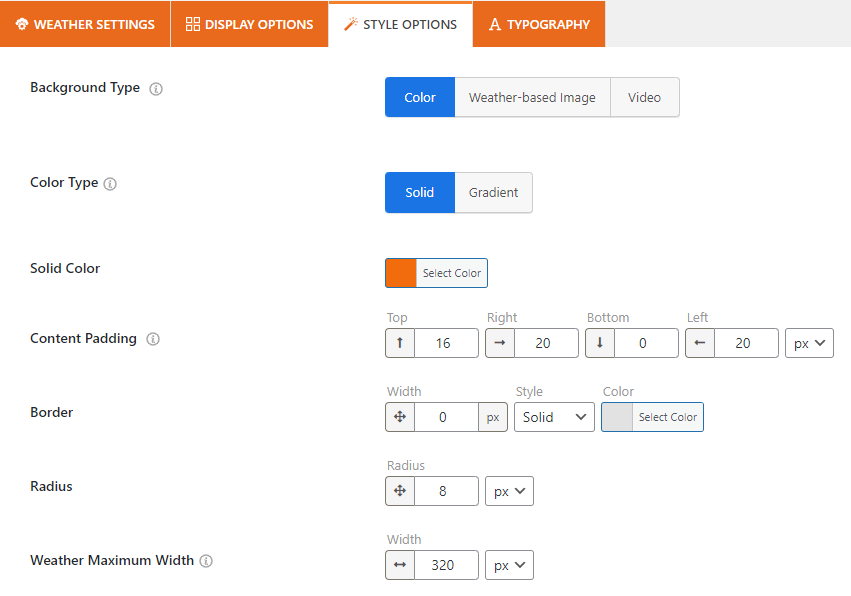
- Excellent backgrounds based on weather conditions
- Solid, gradient, and custom color background
- Image, and video background
- Animated, line, fill, static, and glassmorphism icons of custom sizes
- Custom overlay color
- Set maximum width
- Custom border, radius, and spacing
- Full-featured slider (carousel) for additional weather data and forecast (template-based)
- Advanced typography (fonts, letter & line spacing, text color, and more)
- Translation-ready and mobile-friendly
Step 4: Publish the weather widget on your website
If your weather widget looks perfect, it’s time to hit the publish button to make it live on your WordPress website.
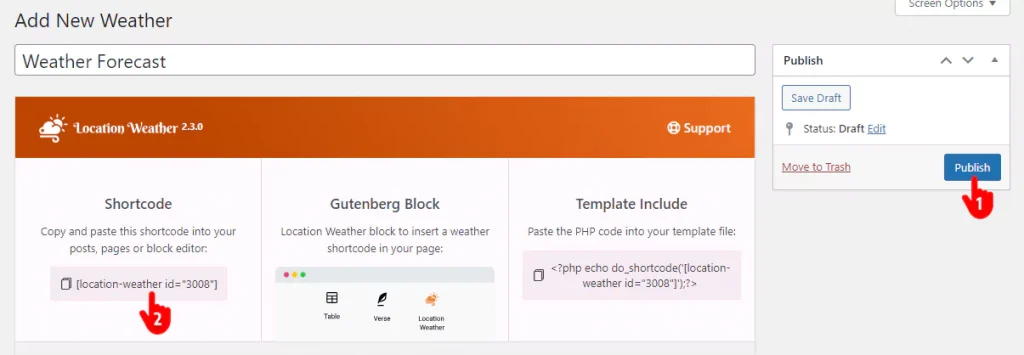
- Click the Publish or Update button at the top right of the plugin.
- Copy the weather widget shortcode.
- Then, go to where on your website you want to publish your weather widget and paste the shortcode.
- Finally, hit the Publish or Update button at the top right of the page or the post.
Great! Your weather forecast is live. It is looking wonderful!
However, apart from the shortcode, Location Weather offers a simple Gutenberg block and PHP code to publish your weather widget in your convenient way.
Take Away
Creating a weather widget for WordPress websites is now simple. With Location Weather, you can do it in 4 simple steps and speed up your weather-impacted business growth.
So, let’s add a weather widget to your website now.
Leave a Reply