
Do you want to create a daily weather forecast for your website in minutes with no code?
Customers of your weather-affected businesses routinely check the weather before booking or purchasing. Therefore, adding daily weather forecasts to your weather-impacted business websites is an effective strategy to assist customers in timely planning without leaving your website and boost sales.
Besides that, many governmental and non-governmental organizations focusing on weather, safety, health, agriculture, environment, and climate change add weather forecasts to their websites to deliver real-time updates to the public. News sites also show weather updates on their websites, as the weather is essential to the news.
I’ll show you how to easily add an accurate and beautiful weather forecast to your WordPress website without writing a single line of code.
So, let’s get in.
4 Simple steps to create a daily weather forecast in WordPress
Step 1: Install and activate Location Weather
Location Weather is the best weather forecast plugin for WordPress. It has the most ratings, active installations, and 5-star reviews in WordPress’s official plugin repository. It has also been featured as the #1 weather plugin on the world’s best platforms, such as Hubspot, WP Beginner, WP Engine, and more.
Location Weather’s robust and beginner-friendly customizations, intuitive backend, regular updates, compatibility, ease of use, one-to-one fast support, and user support made it the number one weather forecast plugin.
Let’s install Location Weather. It’s simple.
However, if you are a beginner (future master), you can read the documentation or watch the following tutorial to install and activate the plugin fluently.
Also, you can contact the Location Weather support team if you need help.
Step 2: Set a weather API key
After you install and activate Location Weather, it will appear on your WordPress dashboard admin sidebar, as seen in the following image. Now, proceed with the easy steps below to acquire a weather API key from OpenWeather and configure it within Location Weather.
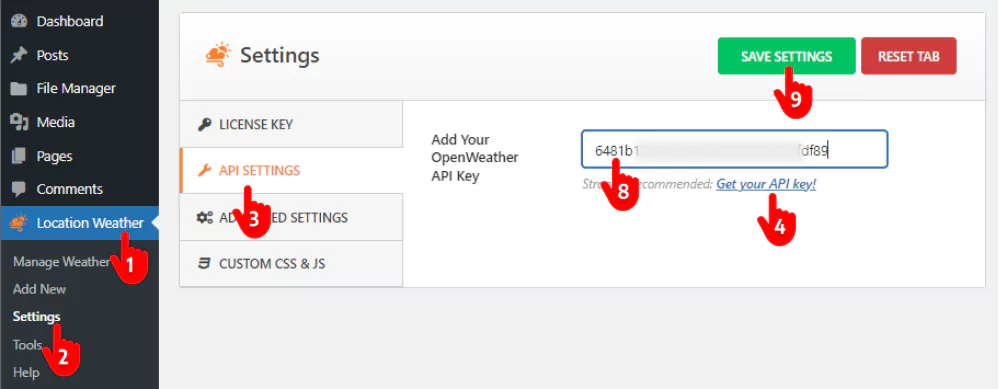
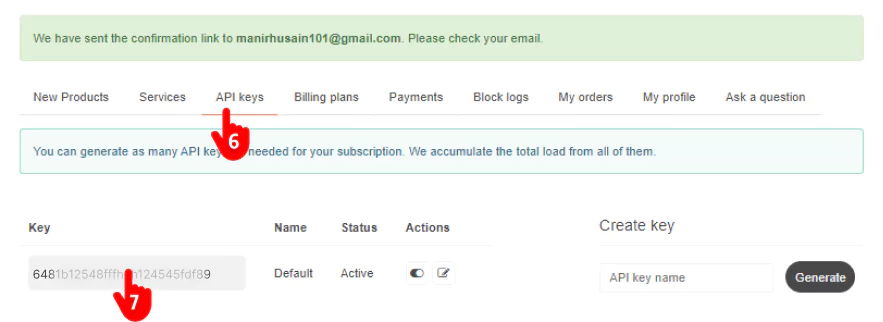
1. First, click Location Weather. → 2. Settings. → 3. API SETTINGS → 4. Get your API key. It will take you to the OpenWeather Sign Up page → 5. Sign up with your name and email. → 6. Click the API keys tab. → 7. Choose the daily forecast API plan that fits your requirements and preferences, and copy the API key*. → 8. Paste your API key in the field. → 9. Hit the SAVE SETTINGS button at the top right.
*Note: A free OpenWeahter API with your valid credit card information provides daily weather forecast data for 8 days for 1000 calls per day. However, when it exceeds 1000 calls per day, it will charge 0.0012 GBP per API call (0.12 GBP per 100 calls). That said, you can set the call limit to 1000 per day to avoid the charge if you don’t need more than 1000 calls daily. You can also choose the Daily Forecast 16-day plan if required.
Step 3: Choose a weather template and customize it
After setting the weather API key, dive into designing your daily weather forecast.
Choose the best weather forecast template
Location Weather offers 17+ beautiful and responsive weather templates for a quick start. Choose the template you like most for your daily weather forecast.
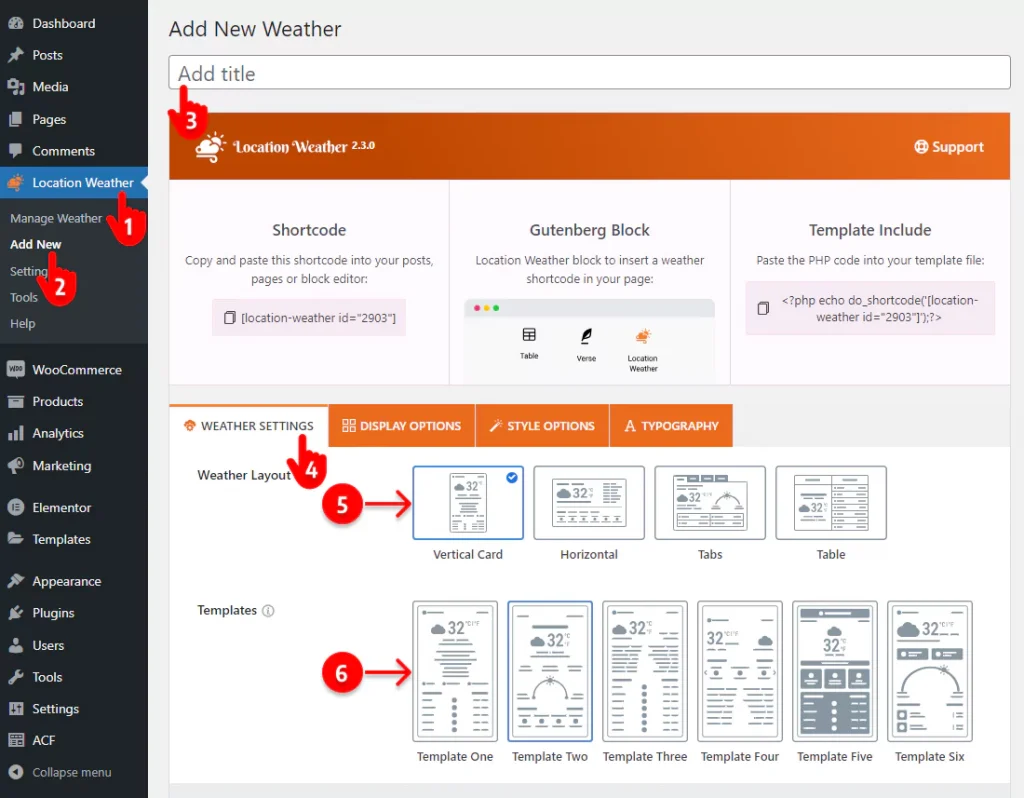
- First, click Location Weather.
- Click Add New of the Location Weather
- Write a title for your new weather widget.
- Let the WEATHER SETTINGS tab remain selected.
- Choose a layout that aligns with your site design.
- Select a beautiful template.
The PREVIEW button on the bottom right side helps you check the appearance of the templates individually and choose the best one for your website.
Customize your weather forecast
Set the location
After choosing a beautiful template, set the location for which you want to display the daily weather forecast. You have two options:
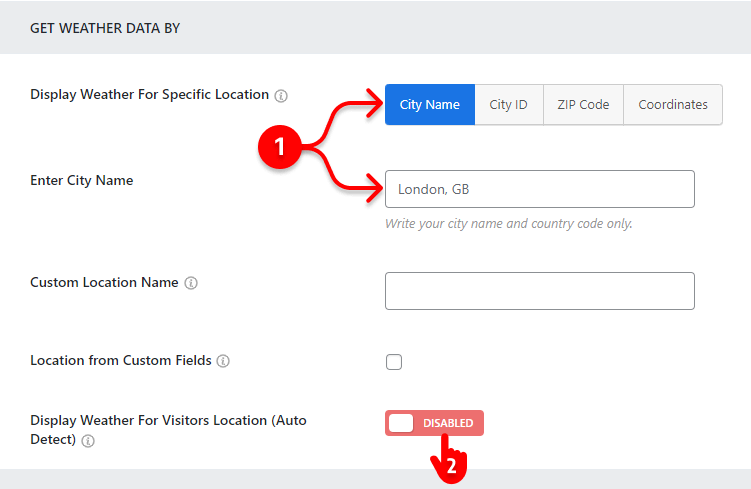
- Showing weather for a specific location like your business or organization area.
- Showing weather for your visitors’ respective locations.
Once you set the location, a basic daily weather forecast is ready for your WordPress website. You can click the PREVIEW button at the bottom right to see how it looks and customize it again and again. Thus, you can make your forecast exactly how it should be.
Use the most common weather data units for the location
While Celsius is widely adopted as the standard temperature unit globally, Fahrenheit is still used in the USA and a few others. Therefore, you should use the most common weather data units for visitors.
Location Weather offers multiple weather data measurement unit options:
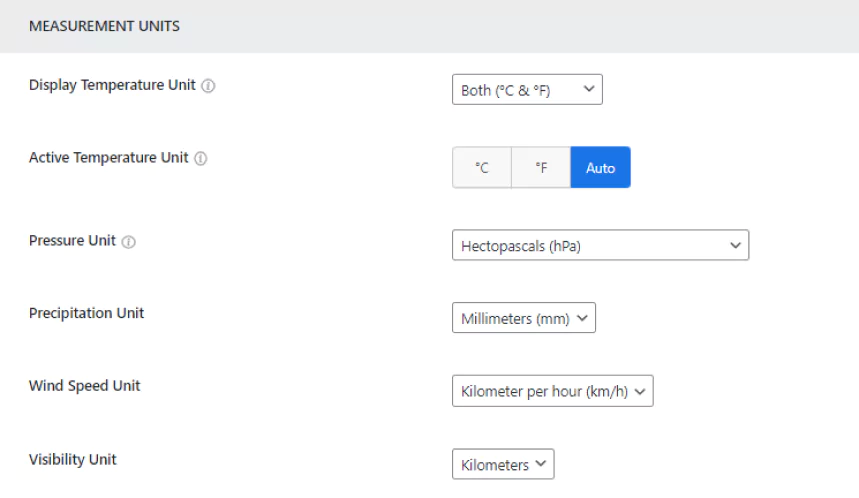
- °C (Celsius) for temperature
- °F (Fahrenheit) for temperature
- Both °C & °F (Auto)
- Precipitation in mm/inch
- 7 Air pressure units
- Four wind speed units
- 9+ date & time formats
- Visibility in kilos/miles
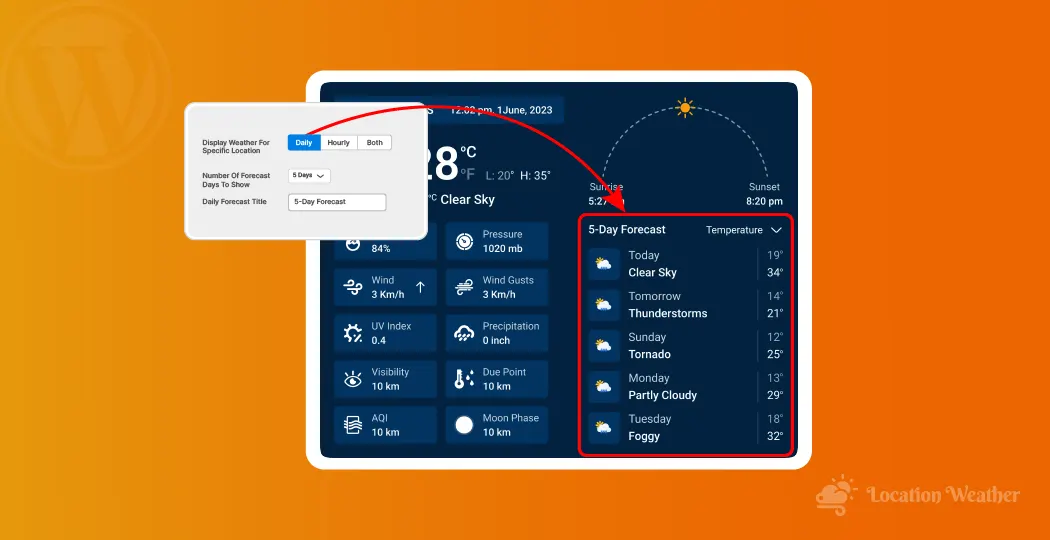
Add forecast data to your daily weather forecast
Follow the simple steps to set weather forecast data for your daily weather forecast for websites.
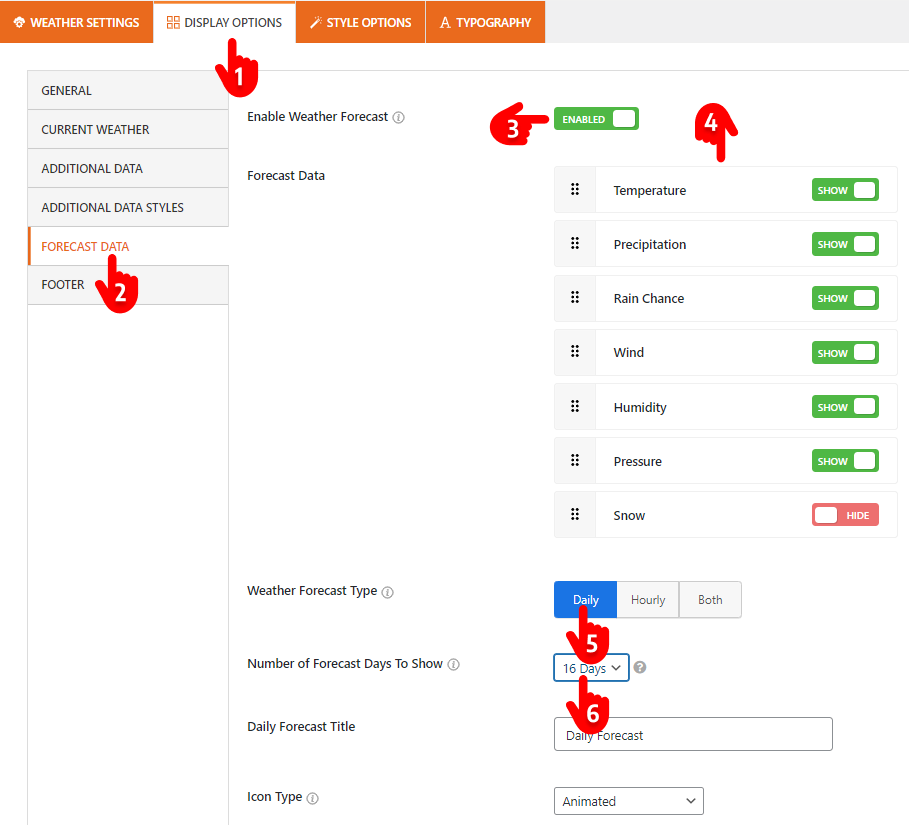
- Select the DISPLAY OPTIONS tab.
- Click the FORECAST DATA tab on the left side vertical tab bar. If you don’t find this tab, please change the template and recheck.
- Turn on the Weather Forecast toggle.
- Show/Hide the forecast data and sort them.
- Select Daily as the forecast type.
- Select the days you want to show the weather forecast for.
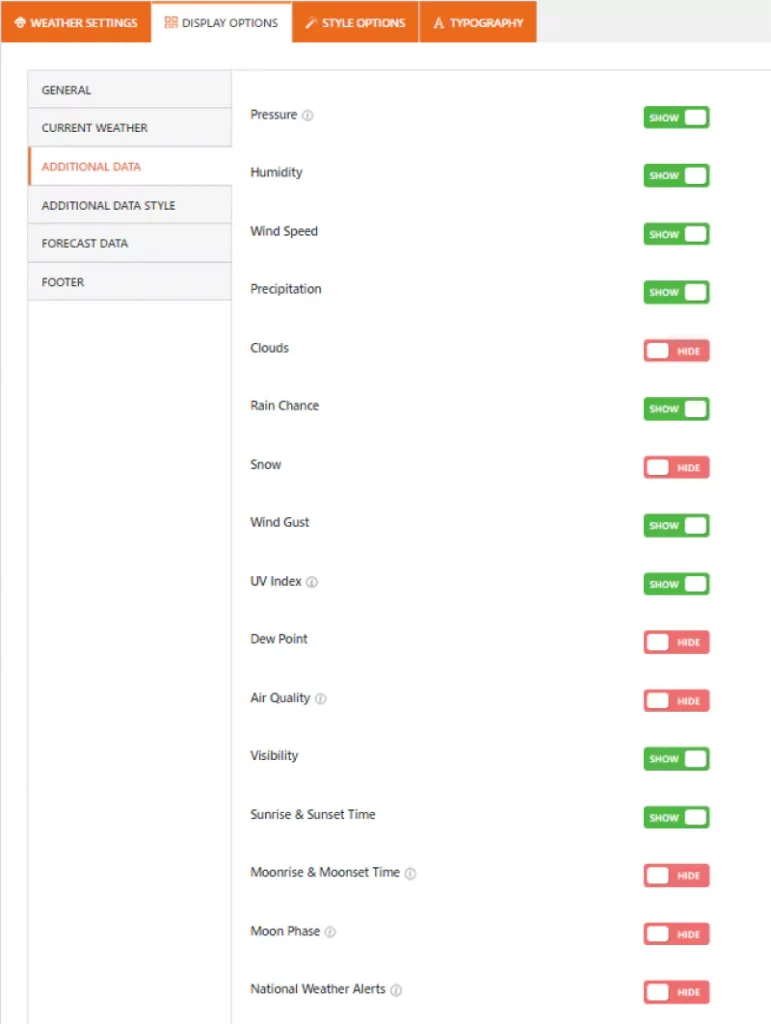
Use additional weather data as per your need
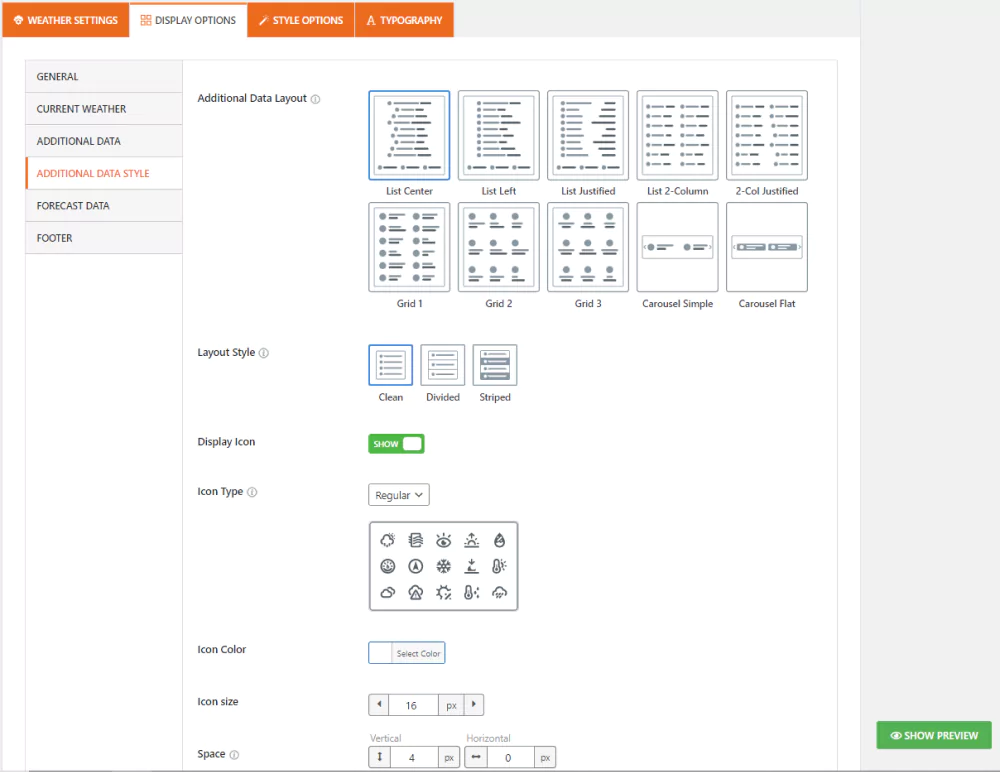
Location Weather provides the flexibility to design weather forecasts in small, medium, and large sizes, allowing customization based on your specific needs and preferences. Alongside various template sizes, the plugin offers over 20 additional weather data toggles, as seen below.
Stylize your daily weather forecast for your website
Location Weather is the best WordPress weather plugin in the market. It offers plenty of powerful and easy-to-use customization features to give you full creative freedom. So, you can make your WordPress weather forecast exactly how you want.
Some of the key customization options are:
- Drag & drop forecast data sorting
- Auto-changed backgrounds based on weather conditions
- Custom solid and gradient colors for the background
- Image & video background
- Customizable animated, line, fill, static, and glassmorphism icons
- Custom border, radius, and dimensions
- Custom overlay color
- Customizable carousel slider for the weather forecast and additional weather data (template-based)
- Advanced typography (fonts, letter & line spacing, text color, and more)
- RTL and translation-ready
- Responsive and touch-friendly
Explore every feature individually and leave no potential of the plugin untapped to make the most of Location Weather.
Step 4: Publish the weather forecast on your website
If your daily weather forecast sounds perfect, it’s time to hit the publish button to get it live on your WordPress website.
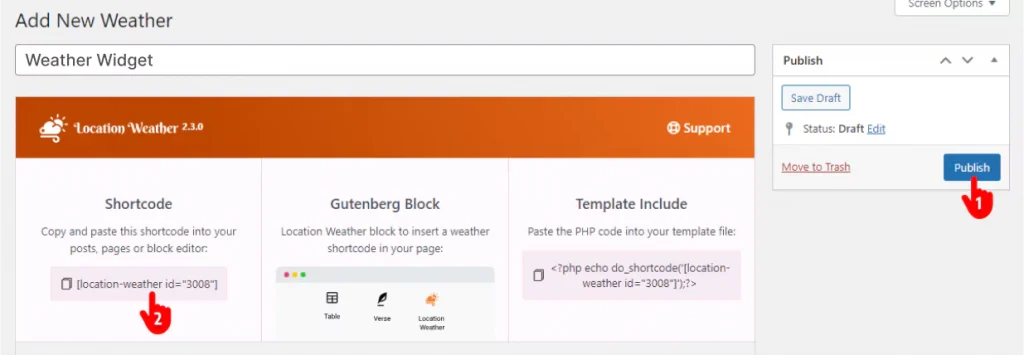
- Click the Publish or Update button at the top right of the plugin.
- Copy the weather forecast shortcode.
- After that, go to where on your website you want to publish your daily weather forecast and paste the shortcode.
- Finally, hit the Publish or Update button at the top right of the page or the post.
Additionally, Location Weather offers a simple Gutenberg block and PHP code for conveniently publishing your weather widget.
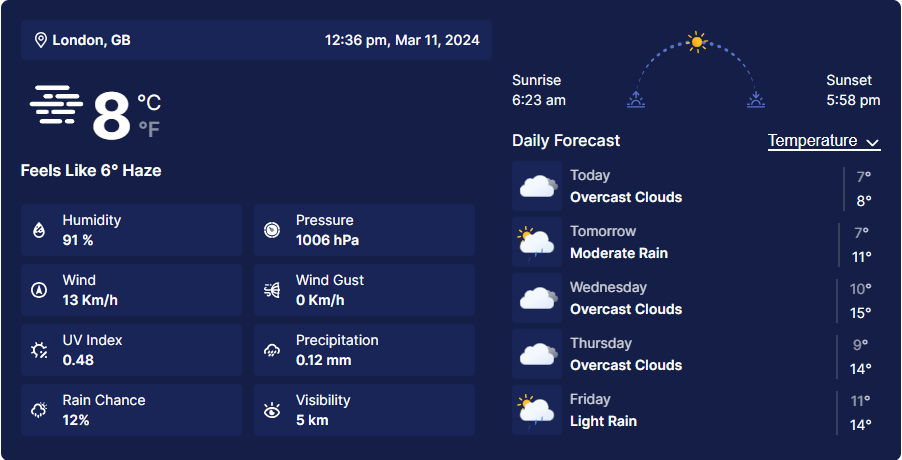
This is how a basic daily forecast looks.
Take away
Weather forecasts help people and your business.
Following the four easy steps above, you can effortlessly create a beautiful and accurate daily weather forecast for websites without code. This will help your customers make timely plans and your business grow.
So, let’s add a daily weather forecast with the #1 WordPress weather plugin now.
Is there anything missing about creating a daily weather forecast for websites that you are looking for? Let’s discuss it in the comment box below.


Leave a Reply